Multi-Browser Configuration via .runsettings Files
How to configure multi-browser tests application using .runsettings files.
Create a new Visual Studio tests project or use an existent one. Use the guide to create a new Atata tests project.
NUnit is used as a test engine in this tutorial. So ensure to reference NUnit and NUnit3TestAdapter packages.
Drivers for Chrome and Firefox in this tutorial are setup using Atata.WebDriverSetup package.
Configuration of Atata.json
Different browser configurations can be defined in Atata.json file (or multiple files).
For example let’s define everything in a single JSON file.
Atata.json
{
  "drivers": [
    {
      "type": "chrome",
      "alias": "chrome",
      "options": {
        "arguments": [ "start-maximized" ]
      }
    },
    {
      "type": "chrome",
      "alias": "chrome-headless",
      "options": {
        "arguments": [ "headless=new", "window-size=1920,1080" ]
      }
    },
    {
      "type": "firefox"
    }
  ],
  "baseUrl": "https://demo.atata.io/",
  "culture": "en-US",
  "useAllNUnitFeatures": true
}
In this example we configure 3 browser kinds: Chrome, Headless Chrome, Firefox.
In case of we have 2 Chrome browsers, the "alias" property is added to both of them: "chrome" and "chrome-headless".
For Firefox "alias" is not required to be set, because it is single and by default it is "firefox".
Configuration of .runsettings files
For each browser configuration that we support, we need to create a separate .runsettings file.
Find out more information on .runsettings file and how to use it in Visual Studio on
Configure unit tests by using a .runsettings file article.
Chrome.runsettings
<?xml version="1.0" encoding="utf-8"?>
<RunSettings>
  <TestRunParameters>
    <Parameter name="DriverAlias" value="chrome" />
  </TestRunParameters>
</RunSettings>
Chrome-headless.runsettings
<?xml version="1.0" encoding="utf-8"?>
<RunSettings>
  <TestRunParameters>
    <Parameter name="DriverAlias" value="chrome-headless" />
  </TestRunParameters>
</RunSettings>
Firefox.runsettings
<?xml version="1.0" encoding="utf-8"?>
<RunSettings>
  <TestRunParameters>
    <Parameter name="DriverAlias" value="firefox" />
  </TestRunParameters>
</RunSettings>
Each .runsettings file sets the "DriverAlias" test run parameter with a value
corresponding to the "alias" of driver configuration defined in Atata.json file.
SetUpFixture
Now let’s bind it all together in SetUpFixture class.
NUnit
SetUpFixture.cs
using Atata;
using NUnit.Framework;

namespace AtataSamples.MultipleBrowsersViaRunSettings;

[SetUpFixture]
public class SetUpFixture
{
    [OneTimeSetUp]
    public void GlobalSetUp()
    {
        string driverAlias = TestContext.Parameters.Get("DriverAlias", DriverAliases.Chrome);

        AtataContext.GlobalConfiguration
            .ApplyJsonConfig()
            .UseDriver(driverAlias);

        AtataContext.GlobalConfiguration.AutoSetUpDriverToUse();
    }
}
Here, through NUnit’s TestContext class the DriverAlias parameter value is gotten.
Then this value is passed to UseDriver method of AtataContext in order to use configuration of driver defined with this alias.
Nothing is required to be added to specific fixtures or the base UITestFixture.
MSTest
SetUpFixture.cs
using Atata;
using Microsoft.VisualStudio.TestTools.UnitTesting;

namespace AtataSamples.MultipleBrowsersViaRunSettings;

[TestClass]
public static class SetUpFixture
{
    [AssemblyInitialize]
    public static void AssemblyInit(TestContext context)
    {
        string driverAlias = (context.Properties["DriverAlias"] as string) ?? DriverAliases.Chrome;

        AtataContext.GlobalConfiguration
            .ApplyJsonConfig()
            .UseDriver(driverAlias);

        AtataContext.GlobalConfiguration.AutoSetUpDriverToUse();
    }
}
Usage in Visual Studio
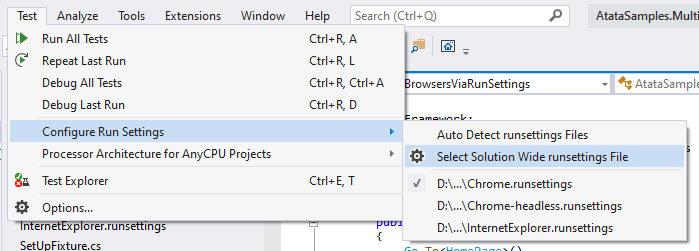
To select/switch current .runsettings file in Visual Studio:

Usage in CI/CD
In order to run tests on CI using concrete browser, use -s parameter of dotnet test command to specify .runsettings file.
dotnet test ./AtataSamples.MultipleBrowsersViaRunSettings.csproj -s Chrome-headless.runsettings