Multi-Browser Configuration via Fixture Arguments
How to configure multi-browser tests application using NUnit fixture arguments.
This tutorial of multi-browser configuration is an alternative approach to Multi-Browser Configuration via .runsettings files.
It is actually recommended to use .runsettings approach.
Create a new Visual Studio tests project or use an existent one. Use the guide to create a new Atata tests project.
NUnit is used as a test engine in this tutorial. So ensure to reference NUnit and NUnit3TestAdapter packages.
Drivers for Chrome and Edge in this tutorial are setup using Atata.WebDriverSetup package.
SetUpFixture
Create the following class:
SetUpFixture.cs
using Atata;
using NUnit.Framework;

namespace AtataSamples.MultipleBrowsersViaFixtureArguments;

[SetUpFixture]
public class SetUpFixture
{
    [OneTimeSetUp]
    public void GlobalSetUp()
    {
        AtataContext.GlobalConfiguration
            .UseChrome()
                .WithArguments("start-maximized")
            .UseEdge()

            // TODO: You can also specify remote driver configuration(s):
            // .UseRemoteDriver()
            //     .WithAlias("chrome_remote")
            //     .WithRemoteAddress("http://127.0.0.1:4444/")
            //     .WithOptions(new ChromeOptions())
            .UseBaseUrl("https://demo.atata.io/")
            .UseCulture("en-US")
            .UseAllNUnitFeatures();

        AtataContext.GlobalConfiguration.AutoSetUpConfiguredDrivers();
    }
}
In SetUpFixture you can configure all browser drivers you want to use.
GlobalSetUp method is invoked only once before all tests execution.
UITestFixture
UITestFixture is often used as a base UI test fixture class.
UITestFixture.cs
using Atata;
using NUnit.Framework;

namespace AtataSamples.MultipleBrowsersViaFixtureArguments;

[TestFixture(DriverAliases.Chrome)]
[TestFixture(DriverAliases.Edge)]
////[TestFixture("chrome_remote")]
[Parallelizable]
public abstract class UITestFixture
{
    private readonly string _driverAlias;

    protected UITestFixture(string driverAlias) =>
        _driverAlias = driverAlias;

    [SetUp]
    public void SetUp() =>
        AtataContext.Configure()
            .UseDriver(_driverAlias)
            .UseTestName(() => $"[{_driverAlias}]{TestContext.CurrentContext.Test.Name}")
            .Build();

    [TearDown]
    public void TearDown() =>
        AtataContext.Current?.Dispose();
}
Using [TestFixture(...)] attribute you can specify any number of drivers you want to use passing driver alias as a parameter.
Driver alias is passed to fixture via constructor argument and then is used in SetUp method to specify which driver to use for particular test (UseDriver(driverAlias)).
Instead of using [TestFixture] attribute you can also use [TestFixtureSource] attribute.
You can also specify custom test name considering driver alias, like above.
Page Object
Create simple page object class:
HomePage.cs
using Atata;

namespace AtataSamples.MultipleBrowsersViaFixtureArguments;

using _ = HomePage;

public class HomePage : Page<_>
{
    public H1<_> Header { get; private set; }
}
Test Fixture
Now we can create specific test fixture with single test. Don’t forget to define constructor and pass the argument to the base UITestFixture class.
HomeTests.cs
using Atata;
using NUnit.Framework;

namespace AtataSamples.MultipleBrowsersViaFixtureArguments;

public class HomeTests : UITestFixture
{
    public HomeTests(string driverAlias)
        : base(driverAlias)
    {
    }

    [Test]
    public void Home() =>
        Go.To<HomePage>()
            .Header.Should.Equal("Atata Sample App");
}
Run Tests
Build project and open Test Explorer panel in Visual Studio.
For Home test you can find 2 items in the Test Explorer panel:
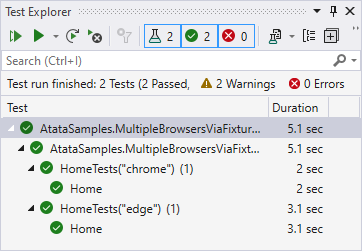
Run all tests and check the results.
Please note that current tutorial requires Chrome and Edge browsers to be installed.